13 DIY Headboard Ideas Guaranteed to Give Your Bed a Boost
Use quilts, drapes, and more to create a beautiful headboard for your room.

Lucas Allen
Although it's an often overlooked design element, a headboard is what ties your frame to the rest of your bedding. While you can certainly purchase a beautiful headboard that complements your space, the piece is actually simple enough to DIY. From stenciling on a beautiful design to repurposing a vintage door, you can produce a headboard that instantly breathes new life into your bedroom.
Related: 20 Small Bedroom Ideas With Big Impact
Quilt Headboard

A makeshift curtain acts as a headboard in this cozy quilt situation. Some of the most distinctive and beautiful bedclothes can be found at tag sales and flea markets. Paint the drapery rod and brackets to match the bedroom walls, and let dry. Install the brackets above the bed, positioning them at the desired height, and put the rod in place. Drape the quilt over the rod, lining up the bottom edges so that it hangs evenly.
Upholster a Folding Partition

We love a folding partition for the pretty way it breaks up a room. Here's another transformative use: Slip it behind a basic bed frame to create a plush and personalized headboard. Recast one you already own with a favorite print—then all you have to do is put your custom piece in place and dream on.
Hang Fabric Drapes

Anchor twin beds with matching fabric drapes in lieu of a traditional headboard. To make the tapestries, hang fabric drapes (ready-made or DIY) in a print you love behind the beds from basic curtain rods.
For presidential suite proportions, hang your drapery panels so that they skim the floor and extend 2 inches wider than the bed on both sides. Ours are 66 inches long, but standard 63- or 84-inch ones work, too. Mount the rods accordingly.
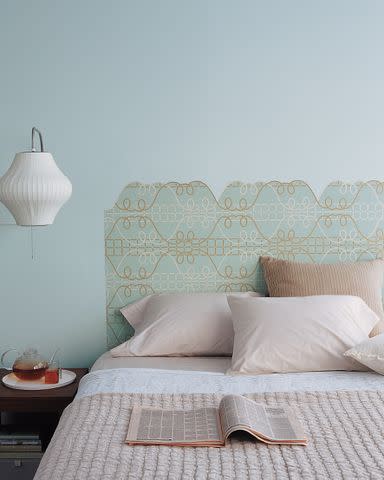
Use Spirograph-Inspired Decals

Give your bedroom a brand-new look with Spirograph-inspired accents that we designed. This fanciful "headboard" is actually a removable wall decal that you just smooth in place. In white, the swirly patterns look almost like embroidery or lace, making them particularly fitting for bedding.
Make a Leather Headboard

The rich, buttery sealed cowhide tiles we mounted in this bedroom could also cover a tray, a desktop, or even a walk-in closet's floor. Apply them to a substrate (like plywood) first, then to the surface you want to cover.
We adhered these tiles to a 4-by-8-foot birch plywood sheet using contact cement, then hung the plywood with two French cleat brackets. Line it up 18 inches from the floor or with the bottom of your mattress, then frame it with whitewashed quarter-round molding.
Get the Leather Headboard How-To
Add Botanical Accents

If you have a slide projector in the basement, here's a use for it. Prop up your headboard against a wall, with the projector pointed directly at it. Set a container of botanical cuttings between the headboard and projector to create shadows.
Experiment with the distance between the headboard, cuttings, and projector until you like the arrangement of shadows. Then, working in sections, trace outlines of shadows, and color them in with chalk pastel. Spray the work surface with four or five coats of clear acrylic sealant and let dry before displaying in your bedroom.
Install Moulding

You can visually anchor your bed with a faux headboard that's easy and inexpensive to put together. The trick: Window or door casing molding, available at any home center or hardware store.
The length of each strip will depend on the width and size of the bed. Here, we created a 48-by-70-inch frame for a queen-size bed using three 5-inch-wide strips (the vertical strips should reach the baseboards). Cut the strips to size with a miter box and saw. Tack them in place every 6 inches with a trim nail, then spackle the holes.
Finally, paint the strips the same shade as the wall, but in a different finish for a subtle pop. Play with the height. Try a shorter version for a modern look, or go tall for a traditional feel.
Create a Woven Headboard With Cotton Straps

This boho-inspired woven headboard is the perfect addition to a room that makes use of earth-toned bedding and plant life. Simply use a plain wooden headboard frame and fill it in using sturdy cotton straps and a basic yet unique tabby weave.
Get the Woven Headboard How-To
Refresh an Upholstered Headboard

Using an already padded headboard, you can easily re-create this modern design. To do so, start by pulling off the existing fabric, then attach newly purchased fabric to the headboard with a staple gun. Smooth the fabric with an iron if needed before placing it behind your bed.
Get the Upholstered Headboard How-To
Wallpaper Headboard
Don't like the sometimes bulky look of a headboard? Opt for this one-dimensional but impactful design instead. Print out our headboard template and trace it onto wallpaper. Cut out the wallpaper so it frames your bed, shooting for about 4 inches wider than your mattress to accommodate the extra width the bedding will add.
Get the Wallpaper Headboard Template
Use Stencils to Create an Intricate Design

This stencil's intricate design will have everyone thinking you custom-ordered this beautiful piece. Make paper copies of the stencil and lay them out in a pattern. Tape the copies to the surface until you have the desired layout. Stencil the first section of the pattern with paint; remove and replace the paper copies with the pattern one at a time, stenciling as you go.
Get the Batik-Pattern Stenciled Headboard How-To
Use Washi Tape

Make a whimsical focal statement in a children's bedroom or teenager's dorm room with this faux headboard made of washi tape. It's a great way to add a splash of color on the wall without the commitment of an actual headboard.
After positioning your bed against a wall, find the center of your bed with the tape measure and lightly mark that spot on your wall with a pencil. Measure out 17 1/2 inches from that point to the left and to the right, and make a small mark (as shown by the two large black dots in Figure 1 template). Those two marks are where the bases of the two outside bedposts will be.
Follow the diagrams—Figures 1, 2, and 3—to mark and tape the remaining dimensions of your headboard. (Tip: To easily cut the washi tape, place a piece of tape on parchment paper, measure, and cut.) Feel free to get creative and add finials or stripes to make it your own style.
Use an Old Door

Check yard sales and flea markets for old doors, and modify the steps below if you find one with a different design. A strip of crown molding along the top edge offers a neat finish and a handy spot for a small alarm clock.
To start, trim the bottom or top of the door so the rails (the ladder-like crosspieces that separate the door's panels) are equal in width. On most old doors, the bottom rail is thicker than the others. A standard-height door will be tall enough for any size bed; trim as needed. Sand, prime, and paint the door.
To mount the headboard, cut a 1-by-4-inch board to the headboard's width, and then cut it lengthwise on a 45-degree angle into two equal strips. Securely screw one strip to the back of the door and attach the second to the wall so the angles interlock to hang the headboard. Keep the bottom of the headboard the same distance from the wall by screwing a 1-inch-thick strip to the back. Finish the top of the headboard by nailing on a mitered crown molding.
Read the original article on Martha Stewart.
