How to Make Perfect Hard-Boiled Eggs | The Food Lab
Our method allows you to routinely produce perfectly boiled eggs with clean-peeling shells!
Back when I was a lowly line cook at a fancy-pants restaurant in Boston, as the new guy, it was my job to wake my butt up at the crack of dawn to come in early and prep breakfast whenever one of the Beacon Hill politicians wanted to impress their campaign funders with boozy waffles and perfectly soft-boiled eggs topping their asparagus.
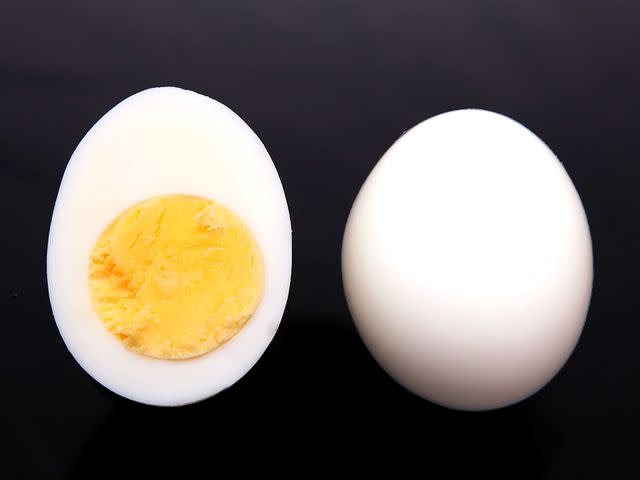
Serious Eats
In those days, I used the brute-force method of getting perfect boiled eggs: I boiled at least three times what I needed, knowing that at least half of them would stick to their shells and get turned into egg salad sandwiches for family meal.
Since then, I've had a bit of time to reflect and refine my methodology. The secret to peeling hard-boiled eggs? Well, secret might be a bit of an exaggeration.
Here's the truth: There is no 100% foolproof method for peeling hard-boiled eggs, and anybody who tells you different is selling something. And I do believe I've tried all the methods, many, many times over. The eggs I've boiled over the last several years in carefully controlled circumstances number well into the thousands, but despite that, the best boiled egg I cooked this year is no better than the best boiled egg I cooked 12 years ago in that Beacon Hill kitchen.
That said, a bit of the old scientific method has helped to greatly increase my success rate. Finding the hard truth about boiled eggs was a tough case to, er, crack. But I can now pretty routinely produce perfectly boiled eggs with clean-peeling shells, and you can, too!
Want the tl;dr version? This is all you need to know:
How to Make Perfect Hard-Boiled Eggs (the Short Version)
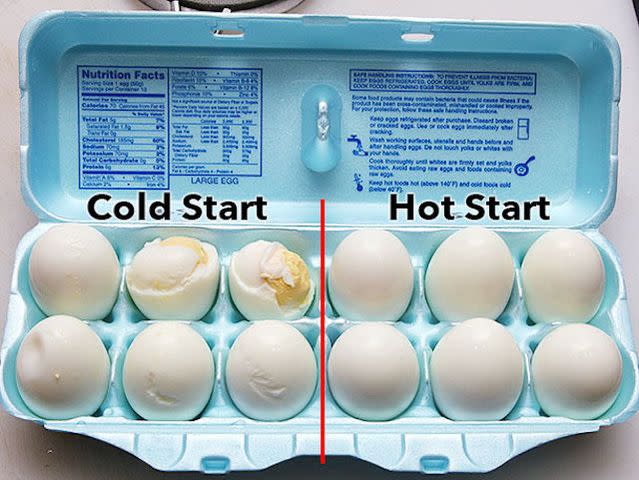
Serious Eats / J. Kenji López-Alt
Lower your eggs straight from the fridge into already-boiling water, or place them in a steamer insert in a covered pot, steaming at full blast on the stovetop. If boiling, lower the heat to the barest simmer. Cook the eggs for 11 minutes for hard or six minutes for soft. Serve. Or, if serving cold, shock them in ice water immediately. Let them chill in that water for at least 15 minutes or, better yet, in the fridge overnight. Peel under cool running water.
No baking, no pricking, no tricks, no gimmicks, that's it.
But, of course, there's still a lot of eggsplaining to do.
Does an Egg's Freshness Affect How Easy It Is to Peel?
The age of an egg does make a difference, but only when the eggs are super-fresh: Freshly laid eggs are more likely to stick to the shell.
In the US, eggs can sit for up to 30 days before being packaged, and the sell-by date can be a further 30 days after that, which means that, most likely, the eggs you're getting at the supermarket are old enough that no further aging at home should be necessary. Still, it certainly doesn't hurt to look for the package with the closest expiration date.
If you're buying your eggs direct from the farmer, or if you keep a couple hens out back, you may want to let your eggs sit around for a couple of weeks before using them for boiling. (And, instead of boiling those super-fresh eggs, might I recommend poaching them using our foolproof method? It's almost a shame to do anything else with them!)
Much more important to the result is the way in which the egg is cooked.
Should You Start Boiled Eggs in Hot or Cold Water?
Let's get one thing out of the way quickly: We're cooking eggs straight out of the fridge here. Tempering by letting them sit at room temperature doesn't make much difference, and it takes a long time to do.*
*For you Euro types who store your eggs at room temperature, everything discussed here still applies.
The factor in my testing that made the most difference in how cleanly eggs released from their shells was the temperature at which they started: A hot start produces easier-to-peel eggs. And it doesn't matter whether that hot start is in boiling water or in a steam-filled pot or pressure cooker. All those eggs will be noticeably easier to shell than those started in a cold pot.
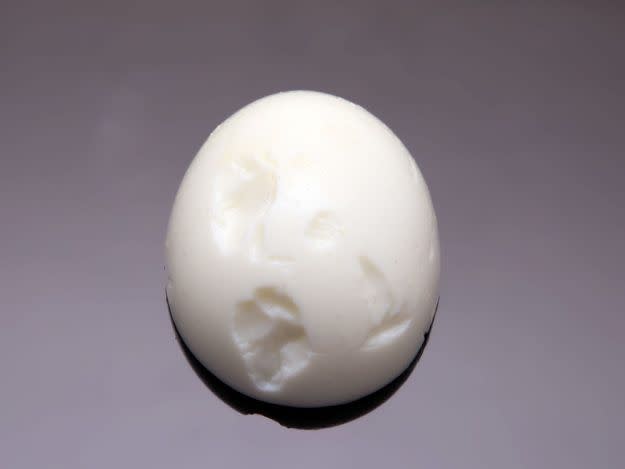
Serious Eats / J. Kenji López-Alt
Even with two-week-old eggs, starting cold resulted in eggs that had just over a 50% success rate for clean peeling. Eggs started in boiling water or steam came out well above 90%.
I don't have a fully satisfactory answer for this phenomenon, but my thoughts are that it's somewhat like cooking a steak in a skillet. Add the steak to a cold pan and heat it up slowly, and as proteins coagulate, they bond with the metal, becoming nearly inseparable. Heat that steak fast, however, and the proteins bundle into themselves instead of sticking to the metal. Slow-cooked egg whites bond more strongly with the membrane on the inside of an eggshell.
This is almost diametrically opposed to the advice I gave four years ago, in my very first Food Lab column. Back then, I did not know what I do now. Back then, I recommended starting eggs in cold water and bringing them up to a simmer with the water, the idea being that they would cook more evenly with a slow start. This is true: Eggs started slow will have more tender, evenly cooked whites.
Why is that? It's because in rapidly boiling water, the exterior of an egg will cook much faster than the center.
Take a look at these eggs, which were cooked in fully boiling water for times ranging from one minute to 15 minutes:
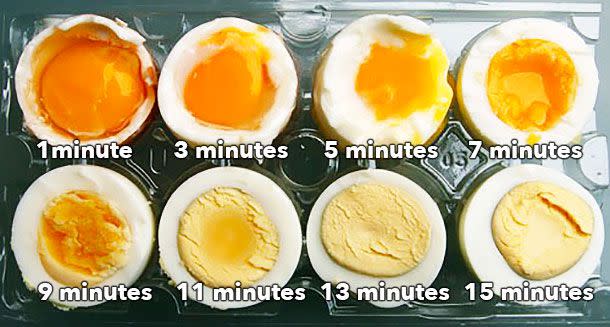
Serious Eats / J. Kenji López-Alt
As you can see, not one of them is a perfect hard-cooked egg: The eggs go directly from having slightly translucent centers to having rubbery whites.
Here's what happens when an egg white cooks at a raging, full-on boil:
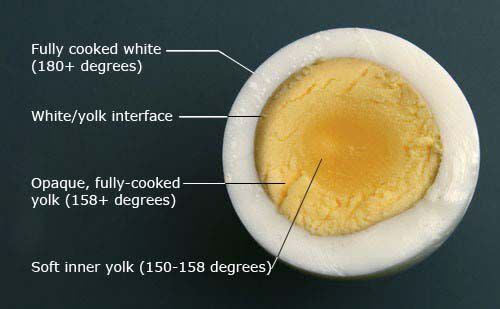
Serious Eats / J. Kenji López-Alt
From 30 to 140°F (-1 to 60°C): As it gets hot, its proteins, which resemble coiled-up balls of yarn, slowly start to uncoil.
At 140°F (60°C): Some of these uncoiled proteins—called ovotransferrin—begin to bond with each other, creating a matrix and turning the egg white milky and jelly-like (like the innermost layers of egg white in the three-minute egg above).
At 155°F (68°C): The ovotransferrin has formed an opaque solid, though it is still quite soft and moist (see the white of the five-minute egg).
At 180°F (82°C): The main protein in egg whites—ovalbumin—will cross-link and solidify, giving you a totally firm egg white (see the whites of the seven- and nine-minute eggs). This is very similar to the gunk that seeps out of the surface of overcooked salmon.
180°F (82°C) and up: The hotter you get the egg, the tighter these proteins bond, and the firmer, drier, and more rubbery the egg white becomes (see the 11- and 15-minute eggs). Aromas of hydrogen sulfide, or "rotten egg," begin to develop. Ick.
Egg yolks, on the other hand, follow a different set of stages:
At 145°F (63°C): They begin to thicken and set up.
At 158°F (70°C): They become totally firm but are still bright orange and shiny.
At 170°F (77°C): They become pale yellow and start to turn crumbly.
170°F (77°C) and up: They dry out and turn chalky. The sulfur in the whites rapidly reacts with the iron in the yolks, creating ferrous sulfide and tinging the yolks.
Thus, for perfect hard-cooked eggs, you want whites that don't cook much beyond 180°F (82°C) and yolks that have just hit 170°F (77°C) throughout. Cooking relatively gently allows for this, but easy peeling requires a full 212°F (100°C) blast of heat.
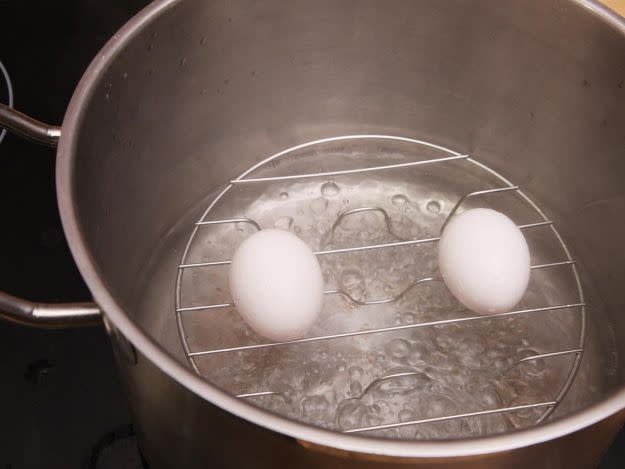
So how does one cook easy-peeling eggs that also have relatively tender whites? There are a couple of options. If you're boiling, you can plunge your eggs into boiling water, let them boil for 30 seconds or so just to set the exteriors of the whites, then drop the temperature and finish them off at around 180 to 190°F, or 82 to 88°C (a very low simmer). You'll end up with eggs that are easy to peel, with tender whites throughout.
Serious Eats / J. Kenji López-Alt
With steam, there's no need to lower the heat—steam's lower density means that steamed eggs actually cook a little more gently than boiled eggs. Your whites will be ever-so-slightly tougher than with simmered eggs, but not enough to be off-putting. The gentleness of steam—and the relative ease of loading up a steamer insert and lowering it into a pot, versus trying to carefully drop eggs one by one into boiling water—also has the advantage of reducing your chances of shells cracking and whites leaking out.
Finally, steaming your eggs has the advantage of being the fastest method around: Instead of waiting for a pot of water to come to a boil, all you need to do is boil a half inch of water. Throw your steamer insert in, cover the pot, set your timer, and you've got perfectly cooked eggs.
Does a Pressure Cooker Produce Better Boiled Eggs?
For a while now, I've been reading about cooking eggs in a pressure cooker. Those articles promise you a magic bullet: Cook your eggs at low pressure in a standard pressure cooker, and they'll practically jump out of their shells.
But here's the thing: I couldn't find a single source that actually tested that hypothesis in a controlled, scientific environment, and all the anecdotal evidence in the world is not worth the pixels it's written with when confronted with strong scientific evidence.
So I tested the pressure cooker method, multiple times, with multiple eggs in each batch, using different pressure cookers, different timings, and different cooling methods. Dozens and dozens of eggs in total.
Not only that, but I tested it side by side with boiled and steamed eggs, and, to get really scientific about it, I went double-blind, with one test administrator (who did not know which eggs had been cooked by which method) handing cooked eggs in random order to a third party, who peeled them all (also with no knowledge of the cooking method for the eggs he was peeling). All of the eggs were rated on ease of peeling (1 = easiest to peel, 10 = most difficult), and were observed for surface damage after peeling.
Guess what? There is absolutely zero correlation between cooking eggs in a pressure cooker and ease of peeling. In fact, depending on how long it took to bring the pressure cooker to pressure, some eggs cooked this way actually showed a slight negative correlation!
There's an even more nefarious problem. Even when you time it perfectly, the pressure cooker produces slightly more rubbery whites than other methods.
Here's the thing: Pressure cookers cook hotter than steaming or boiling—even at low pressure, they hit temperatures in excess of 220°F (104°C). And the hotter something cooks, the greater the temperature differential between the center and the edges.
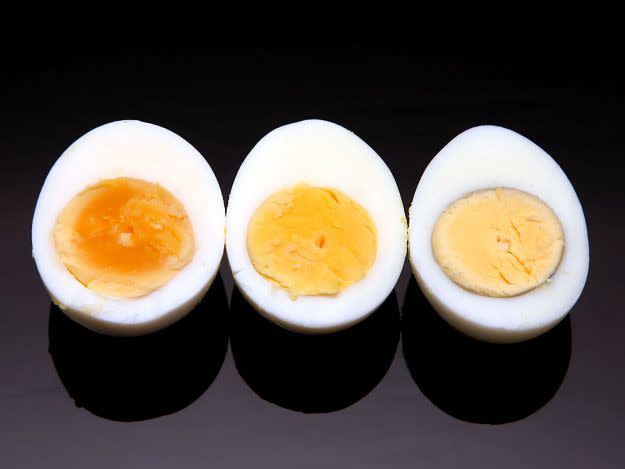
Pressure-cook your eggs for six minutes to get perfectly hard-cooked yolks, and the outer layers of your whites will end up tough. At least, tougher than equivalently steamed or simmered eggs.
Serious Eats / J. Kenji López-Alt
The bigger issue is that pressure cooker eggs have a smaller window of perfection. With a stovetop-simmered or -steamed egg, the difference in results between 10 minutes of simmering and 11 minutes is not that great. Given the rapid cooking of a pressure-cooked egg, however, the difference a minute makes is huge. At five minutes, the yolks are still a translucent yellow. At six minutes, the yolks are tender and just set. At seven minutes, you've already started to develop the dreaded green tinge.
My advice? Save the pressure cooker for things that it actually improves or makes faster. Eggs ain't one of 'em.
Can You Use an Oven to Boil Eggs?
The other method that seems to be getting a fair bit of play is cooking eggs in the oven. Now, nobody wants to heat up the oven just to make a couple of eggs for breakfast, but what if you're making deviled eggs, or breakfast for a crowd? Heating an oven to cook a few dozen eggs seems like it might be a swell idea.
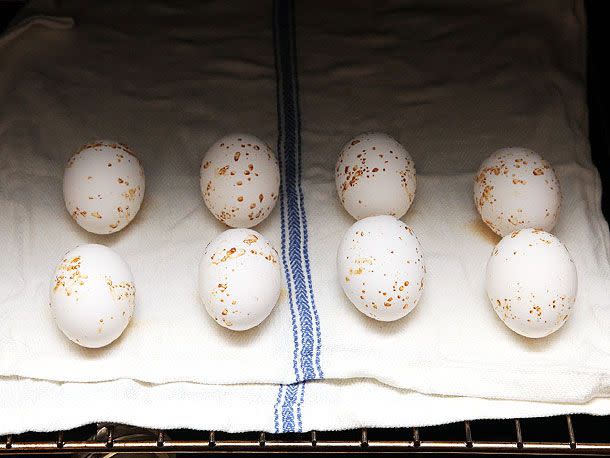
Alton Brown (a generally trustworthy guy) recommends placing eggs on a moistened towel directly on an oven rack in a cold oven, then setting the oven to 320°F (160°C) and coming back 30 minutes later.
Even before I tested the method, alarms were going off in my head. Recipes that call for cooking in an oven while its temperature is in flux (by either starting the oven cold or turning it off in the middle) are never reliable. Ovens are bad enough as it is—most home ovens swing their temperatures by as much as 50°F (10°C) above and below their set temp, assuming they were calibrated well to begin with. To add the confounding variable of how efficiently your specific oven heats or cools on top of that is asking for trouble.
Serious Eats / J. Kenji López-Alt
What may work perfectly in one oven probably won't in another. The method certainly didn't work in mine. One batch heated too quickly and came out with dark spots on the shell and a pale brown color in the white. For a second batch, I lowered the cooking time and managed to get eggs that looked okay when split open, but they were a PITA-and-a-half to peel, which makes sense. Remember: Cold start = harder-to-peel eggs. It doesn't matter if it's in the oven or in a pot of water.
Ovens are inherently unreliable because there is no physics-based indicator or limiter of heat. A pot of simmering or steaming water, on the other hand, stays reliably at the same temperature (assuming constant atmospheric pressure), which means that no matter whose kitchen I'm in and no matter how powerful their stovetop burner, so long as I can boil some water, my eggs will cook reliably, time after time.
When cooking eggs in large numbers, I'll stick with the steamer and cook my eggs in batches if I have to, rather than play Russian roulette with the oven.
A Simple Cure for the Dimple
Does anyone else get bothered by the dimple created by the air space in the fat end of the egg? I sure do. The problem is that the older the egg is, the bigger that air space gets. This means that the eggs that are most suitable for boiling also happen to come out the ugliest,** and nobody wants to be that guy who serves the deformed deviled eggs.
**I'm sure there's some parallel to be drawn here between the kinds of people who are having babies and the kinds of people most suited to raising babies, but that's another subject for another time.
Serious Eats / J. Kenji López-Alt
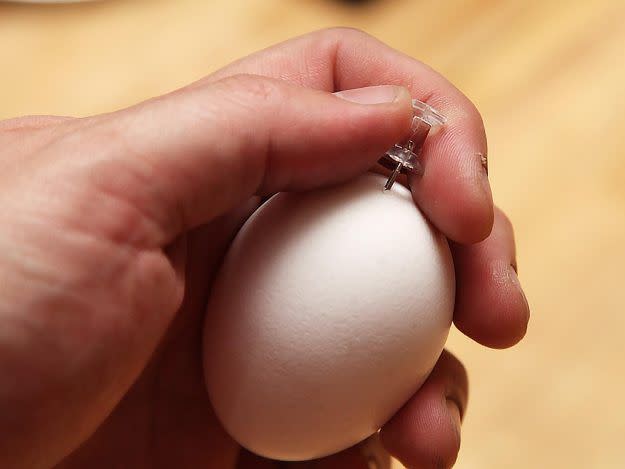
If you're to trust Jacques Pépin (and I usually do!), solving this problem is as simple as pricking the fat end of the egg with a pin. This allows the air inside to be pressed out rapidly as the egg cooks, leaving you with a completely smooth egg. Usually.
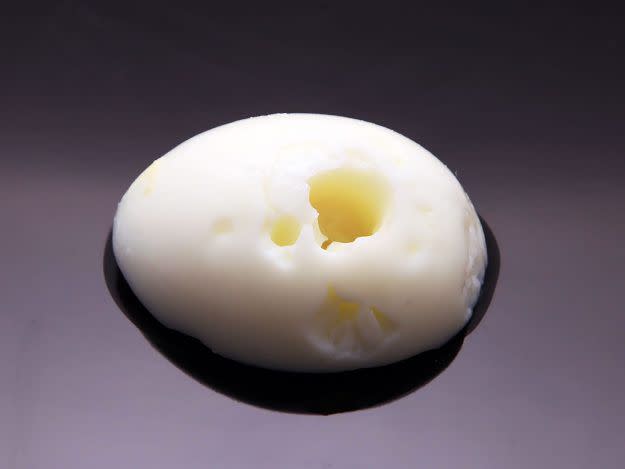
But occasionally, you end up with this:
Serious Eats / J. Kenji López-Alt
Instead of creating a prettier egg, things can go sour when boiling water enters your egg, creating these strange, deep craters. Wouldn't it be great if there were a more foolproof method of getting rid of those dimples?
As it turns out, there is, and it was one I discovered completely accidentally.
See, I came in early one morning to start boiling eggs before the office filled up with coworkers and distractions. I'd gotten through three dozen test runs, working in six-egg batches and testing various combinations of cooking temperatures, cooking methods, and cooling methods. When I started shelling those eggs, I noticed that despite the eggs all having the same origins, some batches of six had perfectly round bottoms, while others had dimples. What was the correlation?
Serious Eats / J. Kenji López-Alt
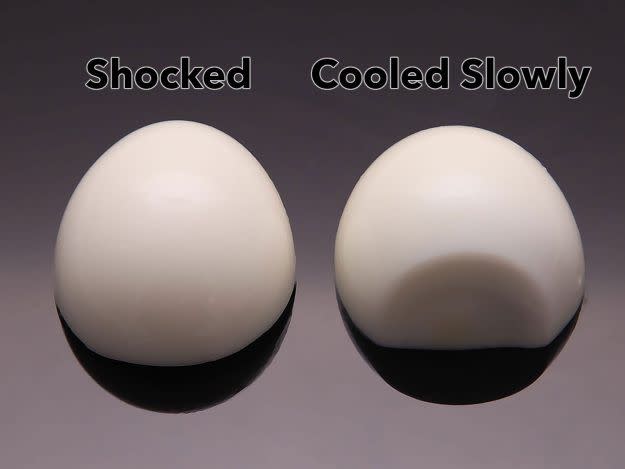
Here it is: The eggs that I had immediately shocked in ice water after cooking came out full-figured and smooth, regardless of the initial cooking method, whereas those that I had allowed to cool naturally had dimples.
Shocking!
My theory? When you pull the hot egg out from the pot, the yolk and white have yet to firm up completely. (You can feel this when you try to peel a hot-from-the-pot egg compared with an egg that has rested or cooled a bit.) By shocking it, you very rapidly cause the steam that has built up inside that air pocket to convert to water, instantly dropping it to about 0.5% of its original volume. The still-malleable boiled egg moves in to fill its place.
Let the egg cool slowly, on the other hand, and by the time that steam has cooled sufficiently, the egg is already basically set in its shape. Instead of the egg moving in to fill that space, air is drawn in through the eggshell.
Further testing is needed to prove the theory, but it sounds pretty legit to me, and the practical effects on appearances are undeniable. Shocked eggs also have a slightly higher success rate for peeling.
The Best Way to Peel Boiled Eggs
One last factor that improves your chances of a successful peel, and it's a major one: Make sure to chill your eggs completely. I mean, let them sit in that ice bath for at least 15 minutes, or, better yet, let them sit overnight in the fridge. The cooler the egg is, the firmer and tighter its structure will be, and the less likely it will be to develop craters when you pry off the shell.
Chilling eggs overnight reduced my count of poorly peeled eggs by a further 50% compared with those peeled after a few minutes of shocking (or, even worse, straight out of the pot).
Sure, sometimes you may want to serve your hard-boiled eggs hot. My advice for those times? Serve them in the shell so that if they don't peel well, it's your guests who will feel inadequate. This is a good strategy for instilling a bit of insecurity and fear in them before a brunch-time debate over politics or religion.
Serious Eats / J. Kenji López-Alt
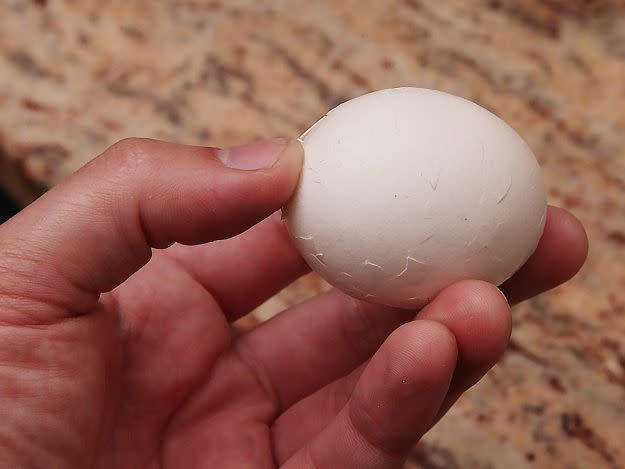
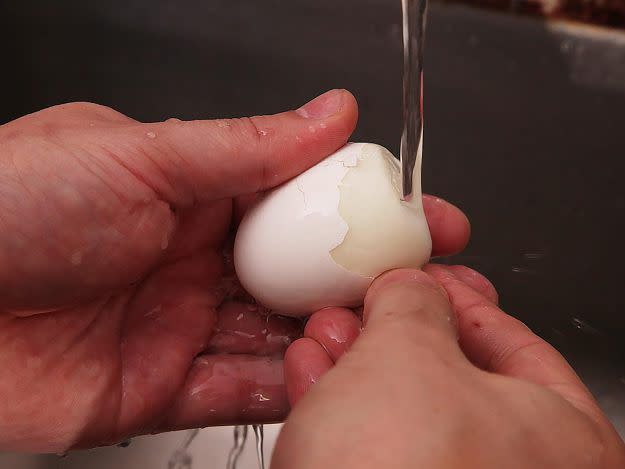
Before I start to peel my eggs, I crack them gently all over their surface, starting at the fat end and gently rotating and tapping all around. I don't use the roll-it-against-the-counter method, as I've accidentally squashed too many eggs with my ham-hands that way.
The many cracks make it easier to gently peel away the shell under running water.
Serious Eats / J. Kenji López-Alt
When I've got a bunch of eggs to peel, I'll place either a fine-mesh strainer or the insert of a salad spinner in the sink under the tap and peel the eggs under the flow, letting the shells drop down into the strainer below for easy cleanup afterward.
And that's about all there is to it. Start with old eggs, cook them hot (but skip the pressure cooker), chill them rapidly and completely, crack all over, and peel under running water.
Another Food Lab article, another few thousand words on a subject that probably really needs only 10, but what are humans if not voraciously curious and insatiably wasteful? At least this time around, there were only two egg puns. But they were egg-ceptional ones. D'oh!
Serious Eats
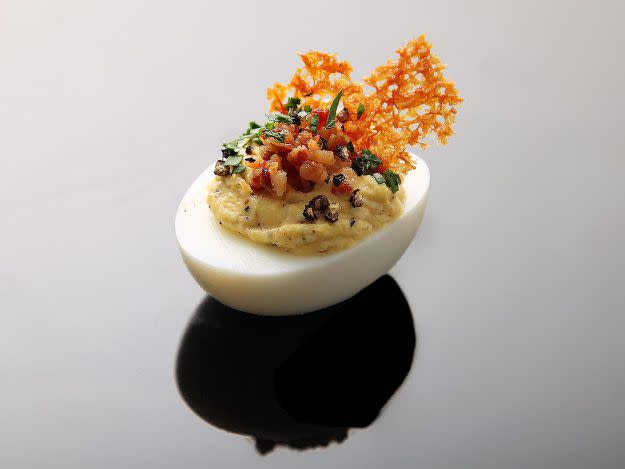
So what does one do with dozen and dozens of boiled eggs? How about these nine in-your-face deviled egg variations?
PS: For the record, baking soda still doesn't make any detectable difference.
May 2014
Read More
Read the original article on Serious Eats.