Your Upper-Back Tension Is No Match For These Simple Stretches

"Hearst Magazines and Yahoo may earn commission or revenue on some items through the links below."
Picture this: You’re hunched over a desk, shoulders are tense and all up in your ears, and you have no idea how long you've been stuck in this painful posture. If you’re anything like me, a few times a day you’ll suddenly realize how tight your upper back really is and how little time you have for a massage.
There's good news: You can find relief right at home with feel-good stretches that will fight off upper-back tension whenever it pops up.
“There are a lot of culprits when it comes to tension in the upper back because our eyes are in front of our head, so we spend a lot more time reaching and looking forward than we do working behind our back,” says Carrie Lamb, DPT, a physical therapist and master instructor at Balanced Body. “Some of the common culprits include computer work, looking down at a phone or screen, spending a lot of time sitting, and doing prolonged work with the arms out in front of the body.”
And while your upper back muscles can get tense from both overworking and underworking, it’s so important to give them some love because a tight upper back and neck is like a “kink in the spring,” adds Lamb.
Meet the experts: Carrie Lamb, DPT, is a physical therapist and Balanced Body master instructor. Maricris Lapaix, CPT, is a certified personal trainer, founder of Move With Maricris, and a coach at Centr.
The upper back includes multiple muscles: latissimus dorsi (lats), levator scapulae (shoulder blade), rhomboids (muscles that pull the scapula inward toward the spine), and the trapezius (traps), says Maricris Lapaix, CPT, a certified personal trainer and coach at Centr. “I’d recommend stretching the upper back as part of an everyday routine since many of us have sedentary work and inconsistent sleep routines.”
So, when is the optimal time for a stretch sesh? First thing in the morning helps you combat a long night of rest (yes, your sleeping positions can create stiffness), or breaking up the work day by taking a few minutes every two hours to release tension, says Lapaix. “This can help relieve any tendencies for “tech neck,” which is a repetitive strain on muscles from being locked in a position of staring at cell phones and computers for long periods of time,” she adds.
The benefits are worth the effort. Consistent stretching will improve your mobility, flexibility, athletic performance, and reduce the risk of injury, adds Lamb.
One quick note before you dive into these oh-so-good upper back stretches: You can take a position too far. If you have osteoporosis proceed with caution, says Lamb. “There are also quite a few organs that refer pain in the thoracic area (upper and middle back), so if you feel tightness along with other symptoms such as shortness of breath, chest pain, or nausea, you should consult with a physician.”
8 Best Upper-Back Stretches
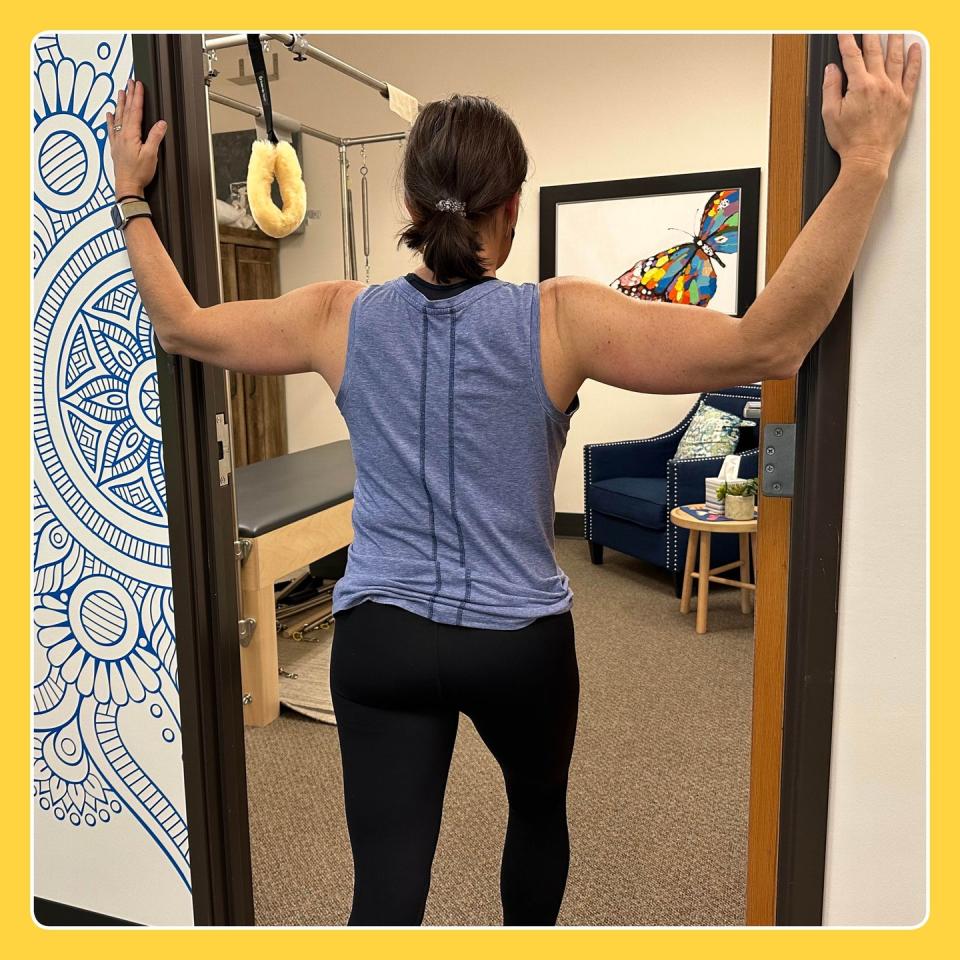
1. Pec Stretch At Doorway
How to:
Stand in a doorway (a corner can work too) and place your arms on the doorframe.
Step one foot forward keeping your arms on the doorframe and lean in just a bit until feel a stretch in the chest or between the shoulder blades.
Keep your head in line with your spine and hold for 30 seconds. Repeat 3 to 4 times.
Pro tip: Lamb suggests exploring this stretch by changing the height of your hands on the doorway and/or doing one side at a time to compare.
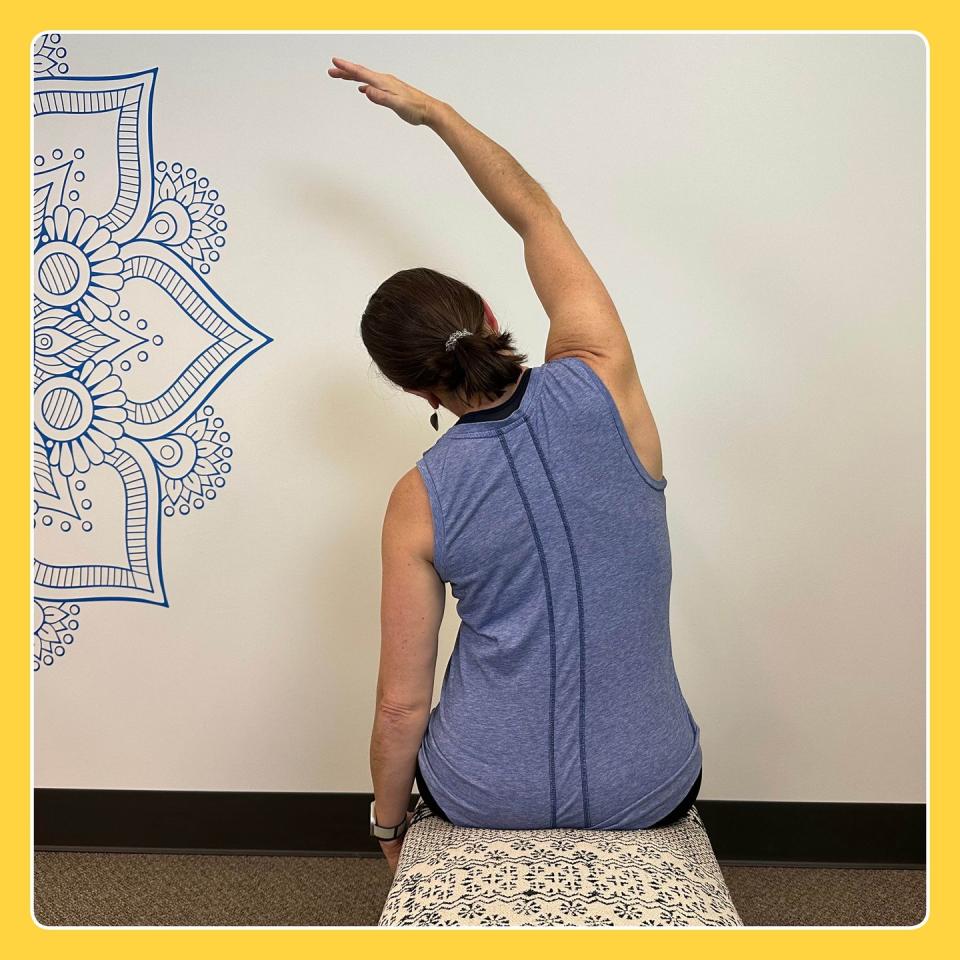
2. Seated Side Stretch
How to:
Sit tall in a chair with your feet firmly planted on the ground and your spine straight.
Reach your left arm up toward the ceiling. Imagine your spine growing taller as you reach.
Continue to reach up as you inhale and bend to the right, keeping your left sit bone heavy in the chair or bench.
Exhale as you sit back up and lower your left arm.
Repeat reaching the right arm up and bending to the left. Do 5 to 8 reps on each side.
Pro tip: You hold the pose for longer (think 20 to 30 seconds) and use your breathing to increase range and sink deeper into the stretch, says Lamb.
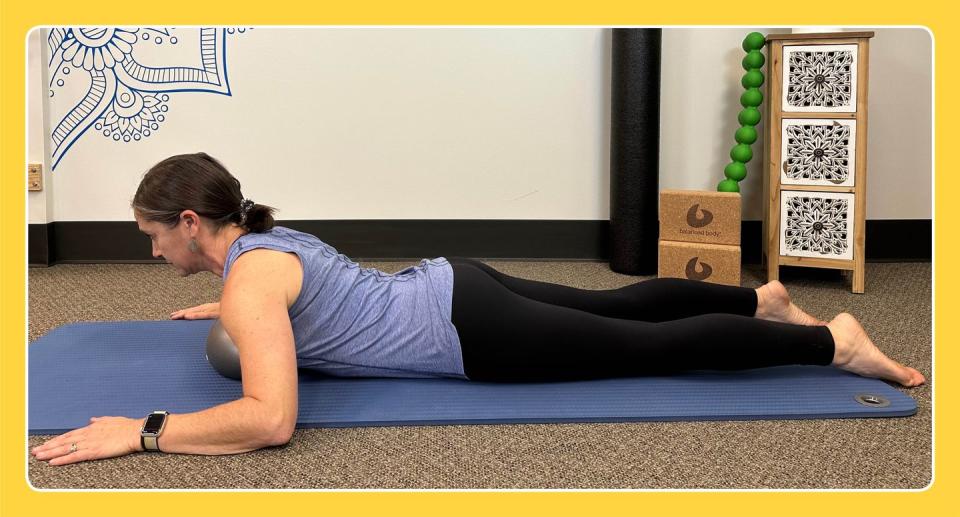
3. Prone Extension With Ball
How to:
Lie on your stomach, and place a small, soft ball (about 8 to 10 inches) under your chest, with your forearms on the ground next to you.
Inhale as you lift your heart and roll the ball slightly forward.
Exhale to lower back down to the starting position. Repeat 8 to 10 times.
Pro tip: “The use of a ball helps the body understand where you are asking it to move since the middle back is an area that is often skipped in movement,” says Lamb. “If you don’t have a ball, consider imagining one there as you perform the same movement.”
Progression: Try lifting the heart and raising and lowering your arms, says Lamb. “If you can lift both arms, stretch them forward and lower your chest, as you pull them back see if you can lift a little higher.”
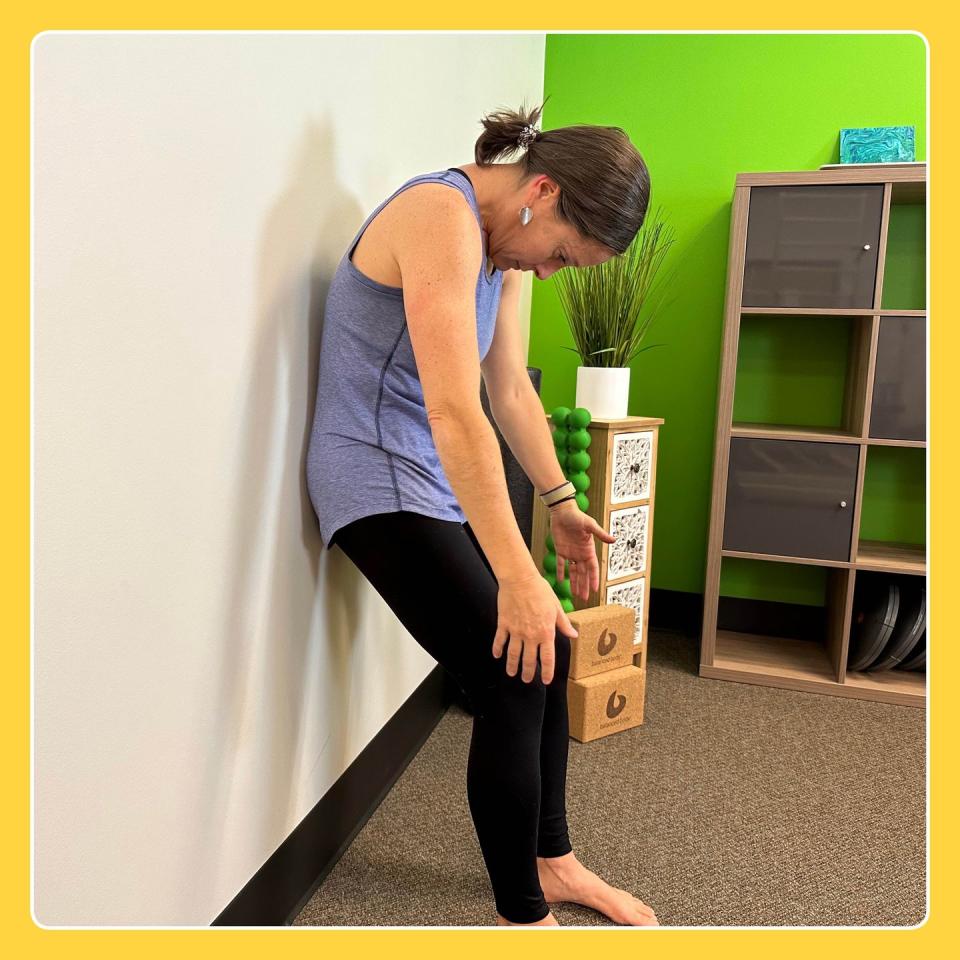
4. Wall Partial Roll Down
How to:
Stand with your back up against a wall, feet about 12 inches away, and a slight bend in your knees with a partial squat.
Starting with the head, gently “peel” yourself down off the wall vertebrae by vertebrae until only your tailbone is touching. If this is painful, only move as far as you feel comfortable and focus on deep breathing as you descend.
Exhale as you start to lift using your abs and reverse the motion, stacking yourself back up one vertebra at a time until the back of your head is touching the wall. That's one rep.
Repeat 5 to 8 times.
Progression: Stretch the arms overhead to begin then pull the arms down the wall into a “goal post” position in between reps, says Lamb.
5. Cat-Cow
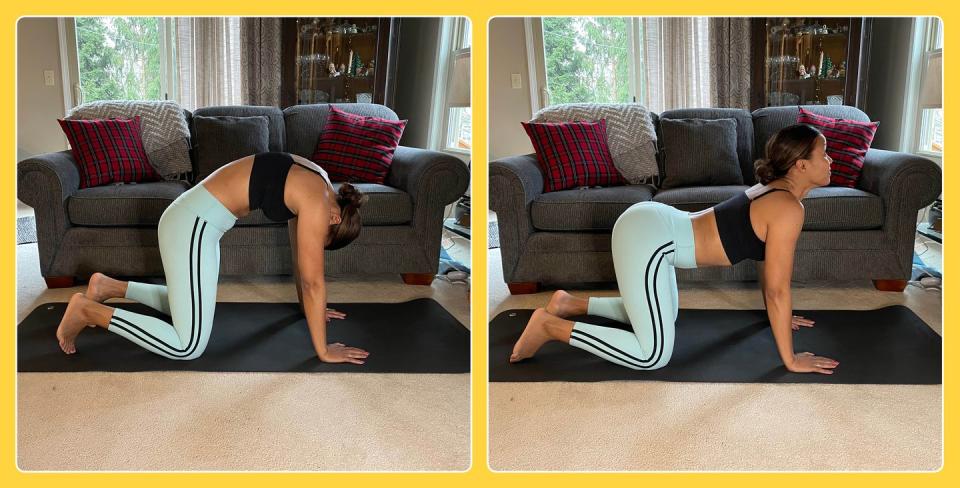
How to:
Start in a quadruped position with arms directly under shoulders and knees under hips, with your spine in neutral alignment.
Inhale and move into a “cow” pose by dropping your belly toward the mat and lifting your chin and gaze toward the ceiling as you arch your back.
Exhale as you shift from “cow” past neutral to “cat” pose by drawing your belly button into the spine and rounding your back. Keep your neck relaxed and tilt your head down. That's one rep.
Repeat 8 to 10 times.
Modification: If you’re experiencing any neck pain, keep it neutral and don’t shift it between positions, says Lapaix.
Pro tip: Knee pain? It’s totally okay to put a towel or yoga matt underneath them to soften any pressure.
6. Child’s Pose With Foam Roller
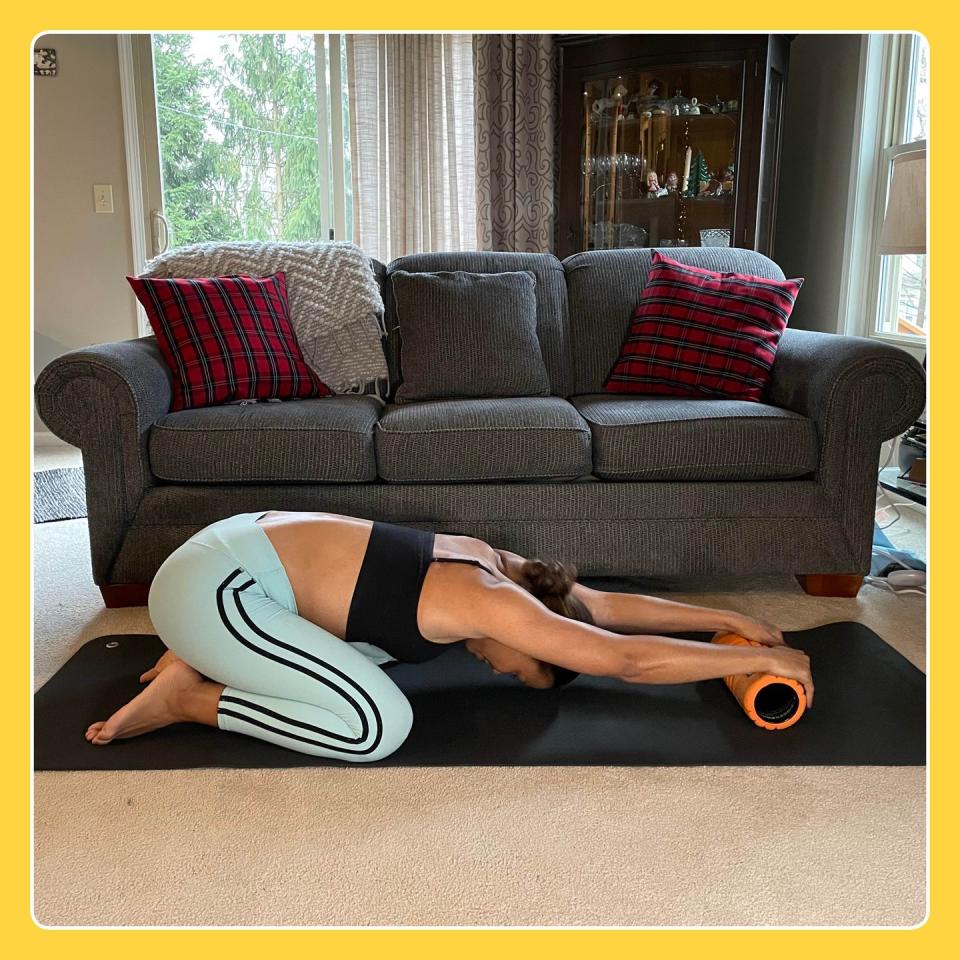
How to:
Start on the floor on your hands and knees with your knees slightly wider than your hips.
Place the roller underneath the palms of your hands and press into the roller to deepen the stretch in your lats.
Hold for 30 seconds, then release.
Repeat 2 to 3 times.
Modification: If you’re new to child’s pose, perform the move without the roller, says Lapaix. “Deepen the stretch by pressing into your fingertips versus having a flat palm.”
Progression: When you’re ready to level-up, perform an active child’s pose by placing your hands at the ends of the roller to deepen the stretch within the lats. Then, shift in and out of child’s pose with the foam roller by lifting the torso and bringing the roller close to knees, then back out to child's pose position, says Lapaix.
7. Thoracic Spine Extension With Foam Roller
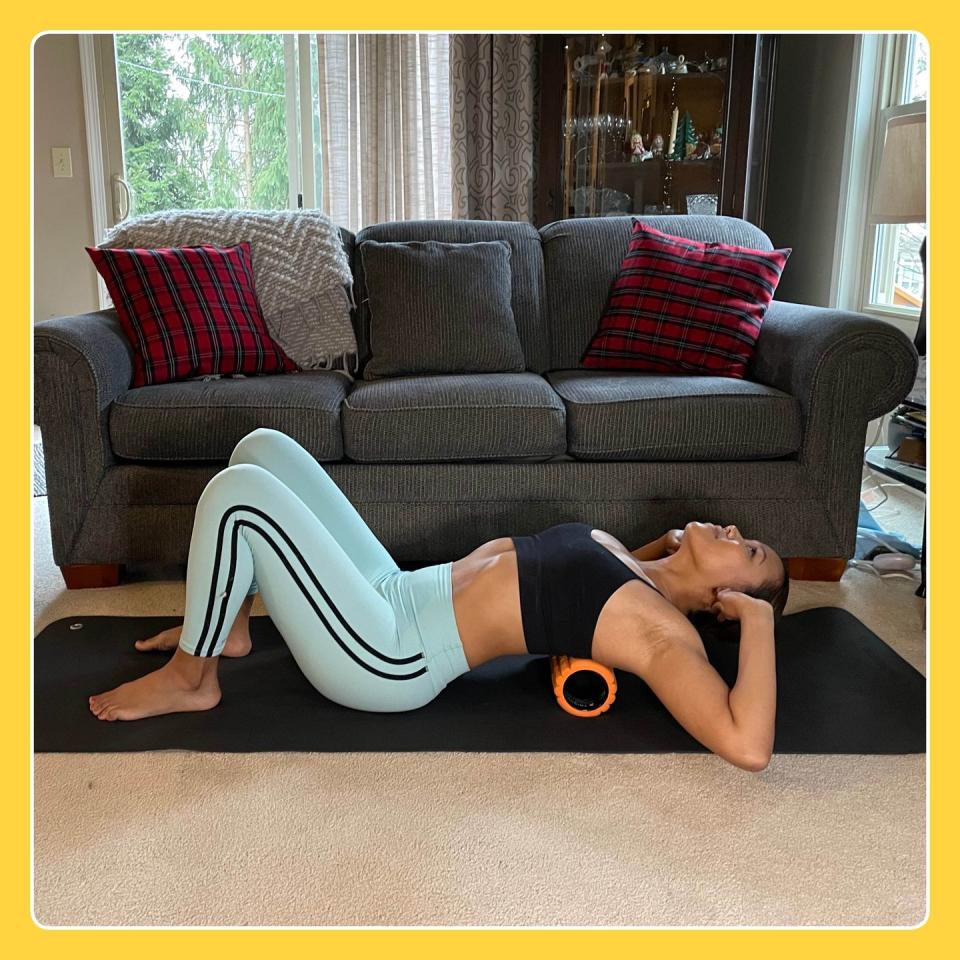
How to:
Lie on your back, with your hands behind your head, knees bent, and feet placed firmly on the ground.
Place the foam roller mid-back and inhale as you extend back far enough to open the chest and feel the stretch. This should not be painful so do not go past the “good stretch feeling.”
Exhale and come back to the start position. Repeat 5 to 6 times.
Pro tip: “Perform at a slow and steady tempo because this can be a sensitive position to transition in and out of, especially after long durations of sitting,” says Lapaix.
Modification: Perform the thoracic extension seated in a chair and place your hands behind your head, keep an upright posture, and lean back over the chair, says Lapaix. Hold for 30 to 60 seconds.
Progression: For a longer stretch, assume the extended position, but extend the arms straight out, says Lapaix. Keep your thumbs toward the ground (they do not have to touch the ground) and hold for 30 to 60 seconds before gently rolling out of the position to reset.
8. Thread The Needle
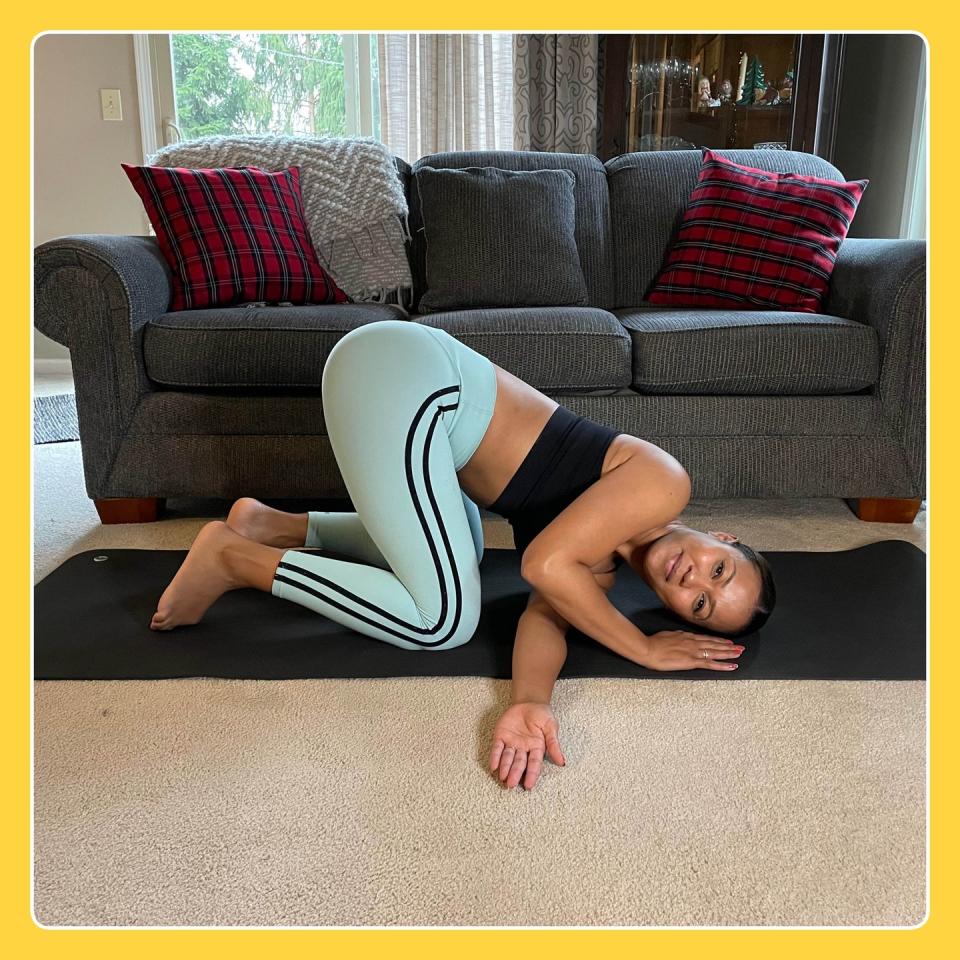
How to:
Start in a table-top position with your arms directly under shoulders, and knees directly under hips.
Lift your right hand and thread under the left shoulder so your head can rest on the floor.
Hold for 30 seconds. Imagine your arm being gently pulled through to deepen the stretch as the upper back rotates.
Repeat on the left side. Do 2 to 3 reps on each side.
Progression: These movements add bonus mobility work to the stretch.
Start as you normally would in a table-top position before you thread one arm under the opposite shoulder and let your head rest on the floor.
Hold for 3 seconds then rotate past the starting position and reach the hand of the rotating arm toward the ceiling. Let your gaze follow your arm and look upward if your range of motion allows.
Do 8 to 10 reps on one side, then switch.
You Might Also Like