How to customize app icons in Windows 11
Curious about how to customize app icons in Windows 11? I don't blame you. It has a few design choices that aren’t everyone’s cup of tea, but one of the best things about Microsoft’s operating system is its openness to customization. If your stock OS looks a little drab, there are plenty of ways to spruce things up and give your platform a new lease on life.
One of the simplest ways to do this is by switching things up with a new theme or color scheme, but if you want to go the extra mile, you can revamp your desktop icons and make your Windows experience a truly unique one.
If you’re wondering how, then worry not — we’ve got you covered. So, get ready to flex your creative flair with our guide on how to make custom app icons in Windows 11.
How to customize app icons in Windows 11
If you’re looking to customize your app icons, then you should probably have a few on hand before we start. Luckily, there are a ton of sites out there offering fresh, high-quality icons ready to download for free.
Sites like FlatIcon, Icon8, and IconArchive have a boatload of interesting icons to take your pick from. The majority of which won’t cost you a dime, though higher resolution and vector icons may require a subscription or purchase.
Make sure that when you download an icon, it’s in the Windows icon filetype (.ICO), or you’ll struggle to apply these icons later in the guide. That aside, go ahead and browse around — get inspired!
If you want a truly unique look for your desktop, then you could always create your own icons if you’re artistically gifted. Just keep in mind that the maximum icon size in Windows 11 is 256 x 256 pixels, so set up your canvas appropriately and remember to save your creation as an ICO file.
Without any more asides, let’s get on with the guide.
Change folder and shortcut icons in Windows 11
Customizing the icon of a folder or shortcut in Windows 11 is easy to do and shouldn’t cause you too much hassle. There’s only one difference between the two and that comes down to the layout of the properties box for each option with the process otherwise being identical. Let’s give it a try.
(Folders) Right-click on the folder you want to change and select “Properties.” In the properties window, click “Customize” along the top row of tabs and then click the “Change Icon…” button at the bottom of these options.
(Shortcuts) Right-click on the shortcut you want to change and click “Properties.” In the properties window, click the tab along the top of the frame that says “Shortcut,” and then click the button below that says “Change Icon…”
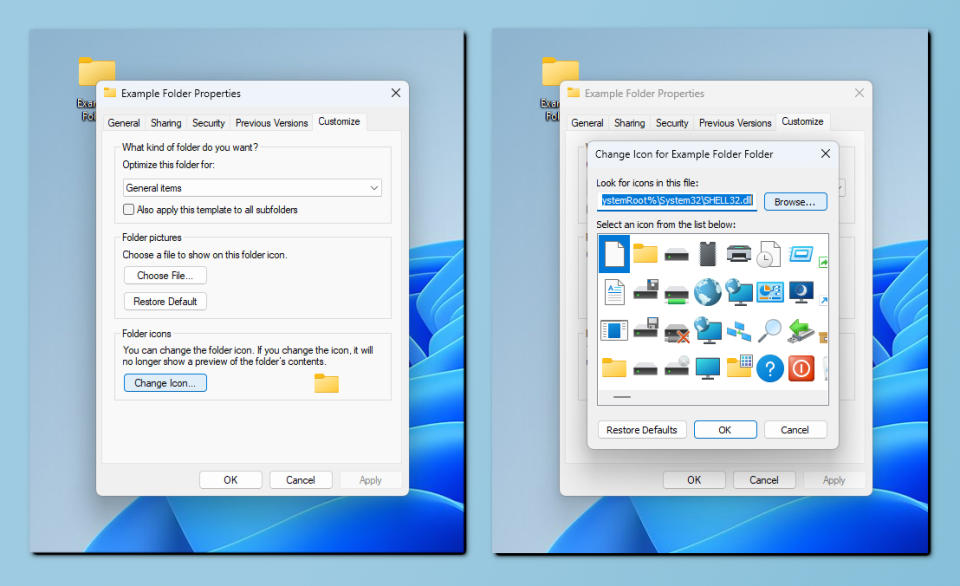
In the window that opens, you’ll have a selection of pre-set icons you can choose from to apply to your folder. But if you want something you’ve downloaded earlier, click the “Browse…” button and navigate to where you saved your new icons.
Select the icon you want and click “Open.” You’ll now see a preview of your icon in a similar window to before. If you’re happy with how this looks, click “OK” at the bottom of this window, or click “Browse…” to pick again.
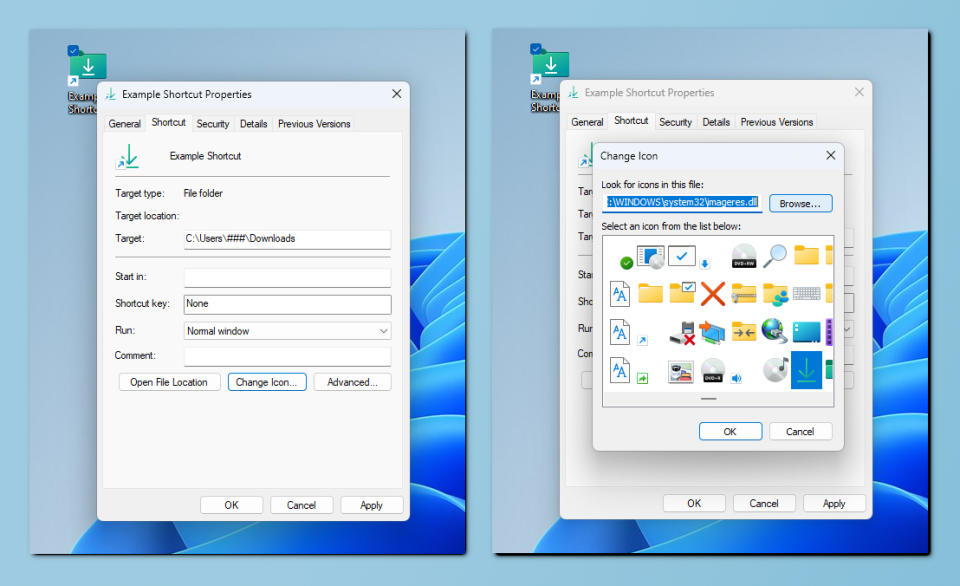
Once you’ve chosen the new icon for your folder, be sure to hit “Apply” in the bottom right of the folder properties window to save your changes, then click “OK” to see your changes in action.
Change default desktop icons in Windows 11
You may have noticed it’s not as straightforward to change the icon of a default desktop icon like This Computer or the Recycle Bin in Windows 11. If you want to customize these icons you’ll need to take a slightly different approach.
Right-click your desktop. In the drop-down menu go ahead and select “Personalization.” In the window that opens, scroll down the items in the right pane until you find “Themes” and give it a click. Scroll down the items in the right pane again and click on “Desktop icon settings.”
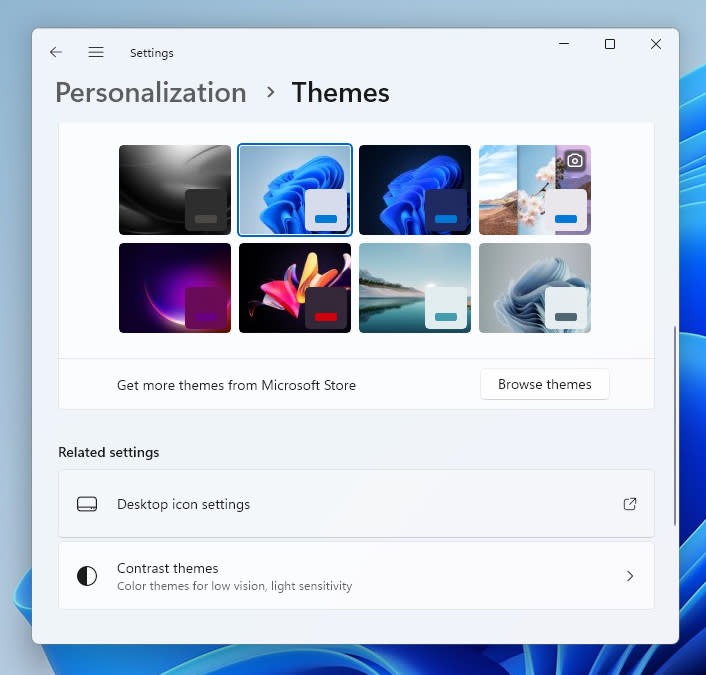
2. Here you’ll not only be able to customize which of Window’s default icons show up on your desktop, but how they look too. Go ahead and select which icon you’d like to change and click the “Change Icon…” button.
3. In the window that opens, click the “Browse…” button and navigate to where you saved your new icons. Select the icon you want to switch to and click “Open.” You’ll now see a preview of your icon in a similar window to before. If you’re happy with how this looks, click “OK” at the bottom of this window, or click “Browse…” to find an icon you’re happier with.
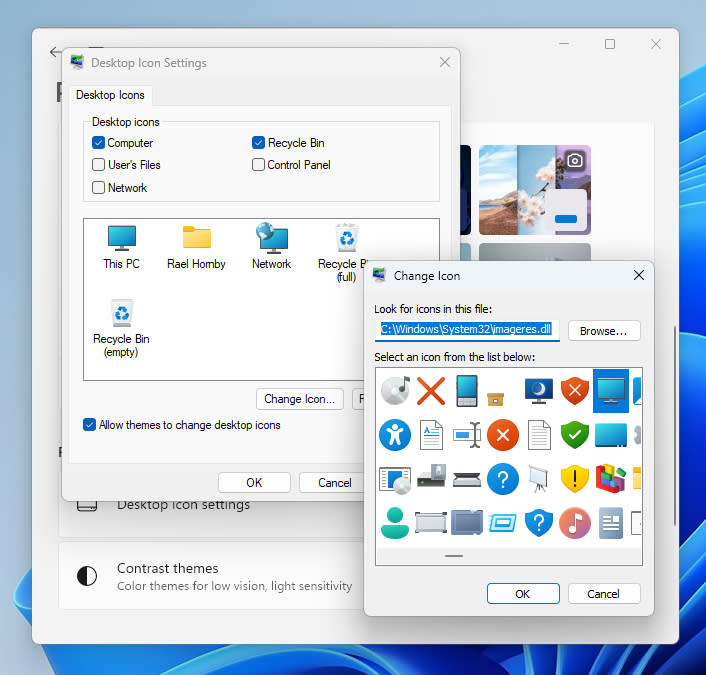
4. You’ll now be back to the Desktop Icon Settings window, where you will see your updated icon in place. Feel free to change as many as you like, if you don’t like the results you can always click “Restore Default” and set things back to how they were. Once you’re done, click “Apply” in the bottom right of the window to save your changes.
