I did a 7-minute pillar bridge plank every day for a week — here are my results

The plank goes by another name — the pillar bridge. And if that’s not confusing enough, I added a rolling pillar bridge into the mix during this Tom’s Guide plank challenge.
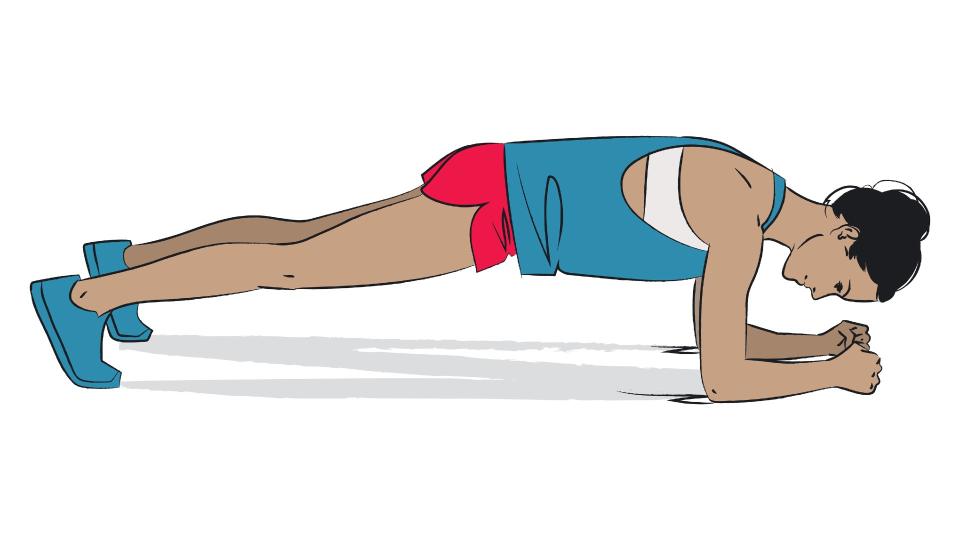
To do the pillar bridge plank, you’ll adopt the forearm plank position, squeeze your fists together, stack your elbows underneath your shoulders and lift your hips in line with your shoulders. It looks similar to the RKC plank (but more on that later), and by pushing through your elbows, your shoulders and abs will instantly fire up.
I added the exercise into my strength routine for seven minutes a day, for one week. I used it as a core finisher after my programs, but you could do this anywhere, anytime. Here’s what went down and how to do it.
How to do a pillar bridge plank

As we continue to clock up the best plank variations at Tom's Guide, we look for ways to spice things up. I decided to take the pillar bridge and do two things — switch up hand position and add movement. Here’s how to do the exercise.
Start on your stomach and stack your elbows under your shoulders.
Tuck your toes, engage your core and push off the floor with your elbows into a forearm plank position.
Stack your hips in line with your shoulders, creating a straight line from head to toe.
Squeeze as many muscles as possible, including your abs and glutes and breathe into your diaphragm.
Keep your neck and spine neutral, looking to the top of your mat.
Squeeze your fists together at the center of your mat. Avoid sagging your hips or lifting your bum too high.
I did a 7-minute pillar bridge plank every day for a week — here are my results
Here’s what happened over the week.
Day 1

A “traditional” plank strengthens muscle groups from head to toe, so my focus was on compound contraction throughout the week, meaning “consciously” switching on as many muscles as possible.
That said, we’ve done traditional planks down to the ground, so I took the pillar bridge plank and played around. First, I programmed seven sets of one minute, then with my timing locked down for the week ahead, I switched up my hand position to a popular one amongst plankers — turning both hands upside down with palms facing upward.
The simple change fired up my arms, particularly my triceps, and got my core trembling early on.
Days 2 and 3
On days two and three, I just wasn’t feeling enough fire, despite the change of hand position, so adopted a rolling pillar bridge plank. To do this, I rested on my elbows with them directly under my shoulders, placed my forearms parallel to each other and created fists with both hands.
Keeping my torso engaged and shoulder stacked over one elbow, I rolled into a side plank (or lateral pillar bridge) and held one ankle over the other, placing a hand on my hip, then rolling over to the other side.
Doing so engaged my obliques far more through rotation and challenged shoulder stability. For the rest of the week, I alternated minutes between a rolling pillar bridge, an up-facing hand position and a regular pillar bridge plank.
Days 4 & 5
You can take a lot from RKC planks here, and the two pretty much look the same, but RKC planks are considered harder due to the high level of contraction maintained. You’ll adopt a subtle hollow hold position by dragging your elbows toward your toes and vice versa without actually moving.
Having done a week of them in a previous challenge, I could take what I learned about upper-body contraction, and apply it here by squeezing my fists tight and externally rotating the shoulders, firing up more upper-body muscles.
I spent the next few days giving my back, belly and bum a big squeeze, grounding my fists down and holding on tight.
Days 6 & 7
My back and shoulders were more on fire than during standard forearm planks, and my muscles were ready to rest. As mentioned, I used the exercise as a core finisher at the end of workouts, and adding rolling pillar bridges helped activate my lesser-used waist muscles – the obliques.
Sure enough, by day seven, I was ready to finish this challenge — time to reflect. Seven minutes of planking a day aside, the exercise itself became repetitive pretty fast.
I spent the next few days giving my back, belly and bum a big squeeze, grounding my fists down and holding on tight.
Verdict
This plank challenge reminded me how important variation is when undertaking any exercise plan. And while a challenge here and there is brilliant for mind and body (and a solid marker of progression), you’ll want to consider how active recovery can help you grow muscle, build strength and get fitter. Spoiler — it’s crucial.
So if you’re thinking about giving this a go, sure, it’s a total core scorcher, but why not increase your recovery too? I’ve added bedtime yoga for the next week to stretch out and mobilize my muscles, but you could consider a walking workout or even getting some extra sleep here and there (find out if 8 hours of sleep is enough).
For me, there just wasn't enough variation available with this plank, and I felt like I'd done it to death already despite mixing up the hand placement and adding dynamic movement.
Beginners, break up the time cap so that you're not overloading muscles. Next time I revisit this, I plan to test my max hold ability and add some weight. RIP core muscles.